

Views: 0 Author: Site Editor Publish Time: 2026-08-25 Origin: Site


A bifold shower door relies entirely on its sealing mechanism to function. When water containment fails, you get structural damage, ruined drywall, and mold. Sealing articulating glass panels presents mechanical challenges you do not see with fixed enclosures. If you pick the wrong profile, you restrict hinge movement and stress the hardware. Undersized gaskets let water escape, rotting the subfloor. Fixing these operational failures requires exact measurements, correct material specification, and proper site preparation. This technical guide breaks down how to evaluate, select, and install the right bifold shower door seal. We will cover gap tolerances, material rigidity, and field-tested installation methods to ensure your enclosure stays watertight and operates smoothly.
Dimensional Accuracy is Critical: The exact glass thickness and the precise gap around the door dictate seal compatibility; generic fits often cause mechanical failure.
Articulation Requires Specific Profiles: A folding shower door seal must accommodate dynamic movement without tearing or unseating during the folding action.
Site Readiness Dictates Success: Installation must only occur over fully leveled trays and plumb, clean, and cured wall surfaces to ensure a watertight perimeter.
Material Selection Impacts Longevity: Balancing rigidity (for grip) and flexibility (for sealing) is essential, often requiring specialized polycarbonate or high-grade silicone.
A successful installation stops water leaks while maintaining smooth operation of the glass panels. The gasket must bridge the gap between moving glass sections or between the glass and the shower enclosure without binding. When a door folds inward or outward, the edges travel through a specific arc. The sealing profile must accommodate this dynamic movement. It needs to compress when closed and release cleanly when opened. Failure to account for this articulation results in gaskets that tear, dislodge, or degrade rapidly under normal daily use.
Achieving the right balance between water containment and mechanical clearance dictates long-term functionality. A gasket that is too thick creates excessive friction against the adjacent panel or wall. This friction stresses the hinges, pulls the door out of alignment, and makes the enclosure difficult to open. A gasket that is too thin fails to block water spray, defeating the primary purpose of the enclosure. You must select a profile that compresses just enough to form a reliable barrier while allowing the hinges to articulate freely without transferring load to the glass.
Shower environments expose materials to constant moisture, heat, and chemical runoff from soaps and shampoos. Non-porous materials and proper drainage design prevent microbial growth within the channels. Water must shed quickly off the surface rather than pooling in crevices or capillary gaps. High-quality extrusions utilize hydrophobic materials that resist the accumulation of hard water scaling and soap scum. Maintaining these standards ensures the barrier remains hygienic and functional over years of exposure to high humidity.
Modern bathroom designs heavily favor clean lines and transparent surfaces. The barrier must remain visually unobtrusive to maintain this design intent. Clear, low-profile designs are necessary to maintain the visual appeal of the enclosure. The material should resist UV degradation and yellowing, ensuring the edges of the glass remain crisp and transparent rather than discolored and aged.
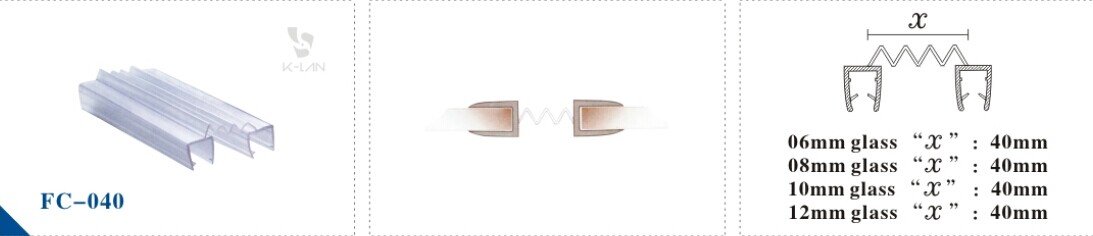
Vertical junctions where glass panels fold require specific profiles engineered for lateral movement. Bulb shapes compress against flat surfaces to block water, absorbing impact and creating a tight barrier. Fin shapes slide past each other or against a fixed panel, deflecting water spray while minimizing friction. You must evaluate the compression tolerances of these profiles to ensure they do not restrict the folding action. Selecting the correct vertical profile depends on whether the panels fold flush against each other or maintain a slight offset when fully retracted.
The base of the door utilizes bottom sweeps and drip rails to deflect water back into the tray while clearing the threshold during operation. Bottom sweeps are the most frequent point of failure due to constant friction against the shower base and exposure to standing water. A well-designed drip rail features a rigid channel that grips the glass and a flexible lower fin that sweeps the tray. Replacing a worn bottom sweep is a targeted maintenance task that often resolves primary leaking without requiring a full door overhaul or hardware replacement.
Magnetic strips ensure a positive, watertight close at the meeting edges of the doors. These closures pull the panels together, eliminating the small gaps that allow high-pressure water spray to escape. Magnetic closures are highly effective in bifold systems because they help align the panels correctly in the closed position, compensating for minor sagging or hinge wear over time. The magnetic pull must be strong enough to hold the door shut against water pressure but weak enough to allow easy manual opening.
Performance depends heavily on material composition and manufacturing quality. Rigid polycarbonate provides the structural grip needed to stay securely attached to the wet glass edge without adhesives. Flexible silicone forms the fins and bulbs, allowing them to bend and compress without tearing or taking a permanent set. High-quality extrusions often co-extrude these two materials into a single, seamless profile. This co-extrusion process delivers both secure mechanical attachment and reliable water deflection.
Profile Type | Primary Function | Best Application | Common Failure Point |
|---|---|---|---|
Bulb Seal | Impact absorption and compression sealing | Vertical wall jambs and 90-degree closures | Compression set over time |
Fin Seal | Water deflection and sliding clearance | Overlapping glass panels and bottom sweeps | Tearing from excessive friction |
Magnetic Seal | Positive alignment and watertight closure | Center meeting edges of double doors | Demagnetization or hard water buildup |
Drip Rail | Redirecting runoff back into the tray | Bottom edge of moving panels | Fin degradation from tray friction |
Accurate measurement is non-negotiable when specifying replacement parts. Use digital calipers to measure the exact thickness of the glass panel. A shower door seal requires exact millimeter matching to function safely. Common glass sizes include 6mm, 8mm, or 10mm. Installing a U-channel designed for 10mm glass onto an 8mm panel guarantees it will slip, fail to block water, and potentially detach during operation. Guessing the thickness with a standard tape measure often leads to purchasing incompatible hardware.
You must measure the void between the glass and the wall, the tray, or the adjacent glass panel to determine the required fin length. Take this measurement when the door is in the fully closed position. Measure at the top, middle, and bottom of the gap, as walls and trays are rarely perfectly plumb and level. Use the largest measurement to determine the required reach. If the gap varies by more than a few millimeters, you must select a profile with a highly flexible fin that can compress tightly at the narrow end while still reaching the wide end.
Off-the-shelf kits work adequately for standard enclosures with perfectly plumb walls and uniform gaps. However, out-of-plumb walls, non-standard glass thicknesses, and unique hinge designs require specialized profiles. In these complex scenarios, partnering with a reputable shower seal supplier is mandatory. They possess the technical inventory to address specific dimensional challenges. Procuring a custom shower seal tailored to bridge uneven gaps ensures the enclosure remains watertight without compromising door functionality or stressing the hinges.
When dealing with custom glass enclosures, standard hardware store options rarely provide the necessary tolerances. You need industrial-grade extrusions that match the exact shore hardness required for your specific hinge type. A heavy glass door requires a stiffer grip channel to prevent sagging, while a lighter framed door can utilize softer compounds. Matching the physical properties of the extrusion to the mechanical load of the door prevents premature failure and ensures the barrier remains intact under daily use.
The shower tray or base must be perfectly level, and the mounting walls must be strictly plumb prior to door and hardware installation. Out-of-plumb walls create tapered gaps along the vertical edges. Standard extrusions cannot bridge severe tapered gaps effectively, leading to leaks at the wider end and hinge binding at the narrower end. If the structural environment is flawed, even the highest quality profile will fail to perform. Verify all surfaces with a high-quality spirit level or laser level before beginning any installation work.
Installation must occur in a completely finished and stable environment. All tiling and grouting must be 100% complete and fully cured. The walls where the door frame mounts must be completely clean, dry, and free of construction dust. Residual dust, moisture, or uncured grout prevents proper alignment and can interfere with the mechanical grip of push-fit channels. Ensure the bathroom is well-ventilated to allow any residual moisture from the construction phase to evaporate completely.
When replacing an existing barrier, you must prepare the glass surface meticulously. Any leftover residue will prevent the new channel from seating properly. Follow these steps for safe and effective removal:
Pull the old weatherstripping away from the glass, starting at the bottom corner and working upward.
Apply a non-abrasive solvent, such as isopropyl alcohol, to dissolve any residual adhesives or hard water mineral deposits.
Use a plastic scraper to gently remove stubborn buildup without scratching the tempered glass surface.
Wipe the entire edge down with a lint-free microfiber cloth to ensure it is completely dry and free of debris.
Inspect the glass edge for any chips or deep scratches that might compromise the structural integrity of the panel.
Scratches weaken the tempered panel and create micro-crevices that serve as a breeding ground for bacteria and mold. The glass edge must be pristine to ensure the new rigid channel grips securely and forms a watertight barrier.
Polycarbonate extrusions require precise cutting to prevent splintering and ensure a clean fit. Use a fine-tooth hacksaw, specialized PVC snips, or a rotary tool operating at a low speed. Measure twice and cut once. A clean, square cut ensures the profile sits flush against the hinges, wall jambs, and adjacent gaskets. Rough or angled cuts create small voids where water can penetrate. After cutting, lightly sand the edges with fine-grit sandpaper to remove any burrs that could scratch the glass during installation.
Always dry-fit the folding shower door seal before drilling final hinge mounts or securing retaining channels. This sequencing guarantees the gap tolerance is exact and door movement remains completely unrestricted. Slide the extrusion onto the glass and operate the door through its full range of motion. Listen for scraping and feel for resistance. A profile that fits too tightly will stress the hinge hardware, potentially causing the glass to slip in its mounts or the hinges to fail prematurely.
Most push-fit designs rely entirely on mechanical tension to grip the glass securely. This is especially true when installing a frameless shower door seal, which must maintain a clean aesthetic without messy adhesives. However, securing fixed panel channels often requires the application of mold- and moisture-resistant silicone. Apply bathroom-grade silicone sparingly and only where structurally necessary. Push-fit channels on moving panels should generally remain adhesive-free to allow for easy removal and cleaning during future maintenance. If silicone is required, ensure it is fully cured according to the manufacturer's specifications before exposing the shower to water.
After installation, execute a rigorous testing protocol to verify mechanical function and water containment. Open and close the door multiple times to check the fold mechanism for binding, friction, or unusual noises. Conduct a controlled water spray test, directing water from the showerhead directly at the sealed joints. Inspect the exterior of the enclosure for any signs of moisture escape. Adjust the position or trim the fins immediately if any water breaches the barrier.
Measure your glass panels with digital calipers to confirm the exact millimeter thickness before ordering any replacement parts.
Map the gap between the glass and the wall at the top, middle, and bottom to identify any out-of-plumb tapers.
Dry-fit all new gaskets and test the door's full range of motion to ensure hinges do not bind before applying any silicone.
Conduct a targeted water spray test along the vertical and bottom edges to verify complete water containment.
A: Use digital calipers to measure the exact thickness of the glass panel. Close the door and measure the gap between the glass and the wall, tray, or adjacent panel. Take measurements at the top, middle, and bottom to account for uneven walls and determine the maximum required fin reach.
A: This occurs when the installed profile is designed for a larger gap or thicker glass than your enclosure possesses. The oversized extrusion creates excessive friction against the adjacent surface, causing hinge bind, stressing the hardware, and making the door difficult to operate.
A: Frameless doors require specific extrusions with a rigid polycarbonate U-channel designed to grip the bare glass tightly. Standard versions intended for framed doors lack this mechanical grip and will slip off the frameless glass edge during operation.
A: Diagnose bottom sweep failure by checking for torn fins or loss of flexibility. You can execute a quick replacement by pulling off the old sweep, cleaning the glass edge thoroughly, cutting a new sweep to the exact length, and pushing it firmly onto the bottom of the door.
A: Replacement timelines depend on usage and water quality. Generally, replace them every two to three years. Hard water exposure accelerates material degradation, while inadequate ventilation promotes mold accumulation inside the channels, necessitating earlier replacement.
A: Use a fine-tooth hacksaw or specialized PVC snips to achieve a clean cut. Measure carefully and cut slowly to avoid cracking or splintering the rigid plastic channel. Smooth any rough edges with fine sandpaper before installation to prevent scratching the glass.
A: Most push-fit designs rely entirely on mechanical tension to grip the glass securely. You should avoid using silicone on moving panels to simplify future replacements. However, bathroom-grade silicone may be used sparingly if the fit on a fixed panel is marginally loose.


